How to Add Image Credits in WordPress
The internet is an amazing place. There is a bounty of free resources online to help you make your blog look professional.
But not everything that looks free is actually free.
If you want to add amazing photos to your site, you can’t just grab any image you find on the web. Images fall under copyright protection, so you’ll want to either pay for an image service like Shutterstock, or pick from one of the free online image galleries.
Some artists require you to give them credit on your site for using their images, and some do not. But it is always best practice to give image attribution when possible in WordPress.
Giving image credits in WordPress when you use an artist’s image helps the artist reach more people. If you are using an image on your site, you can help the artist get more work by adding credits, so it’s worth doing if you can.
This post will show you how to properly add credits to images you use in WordPress.
What Happens If Images Are Not Properly Credited?
With the large quantity of images available on the internet it may be tempting to just grab something you like from a Google image search.
In fact, people do exactly this. But this can lead to legal trouble and fines.
There are lawyers whose job it is to find websites that are illegally using their images, and fine them for doing so.
Because of this you’ll want to ensure that you are using images from a reputable service. You’ll want to read the rules of usage. Some image services require payment to use an image. Some give you images for free but may or may not require the images to be credited.
How to Properly Add Image Credits in WordPress
WordPress makes adding image credits easy.
Simply upload an image to WordPress through the WordPress media library. Once uploaded you can select the image and add it your post.
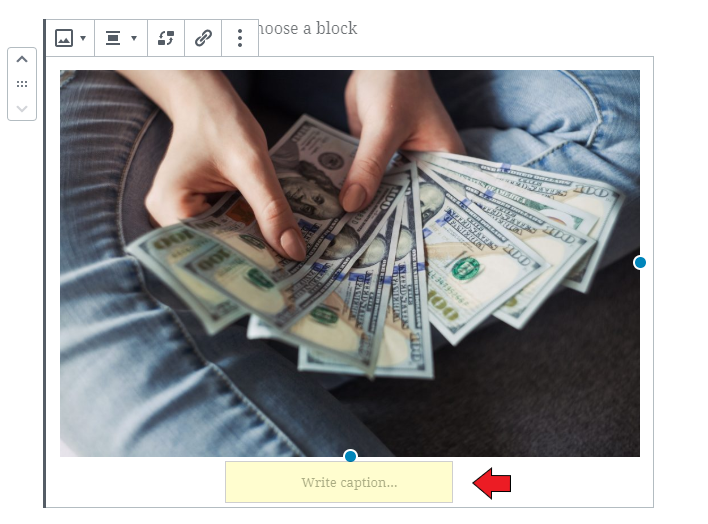
When the image is in your blog post you’ll notice that there is an area below it in the image block to add a caption:

It’s here that you can add image attribution. You can also link back to the copyright owners original source as well.

How To Find the Image Credit Information
If you have downloaded an image off the internet, and there is no way to find out what the licensing is or how to give credit, then it’s probably not an image that can be freely used.
Image services like Shutterstock will have clearly written language that will instruct you on exactly how to legally use their images.
But what about free services? There are plenty of free stock photos online.
Let’s use Unsplash.com as an example.
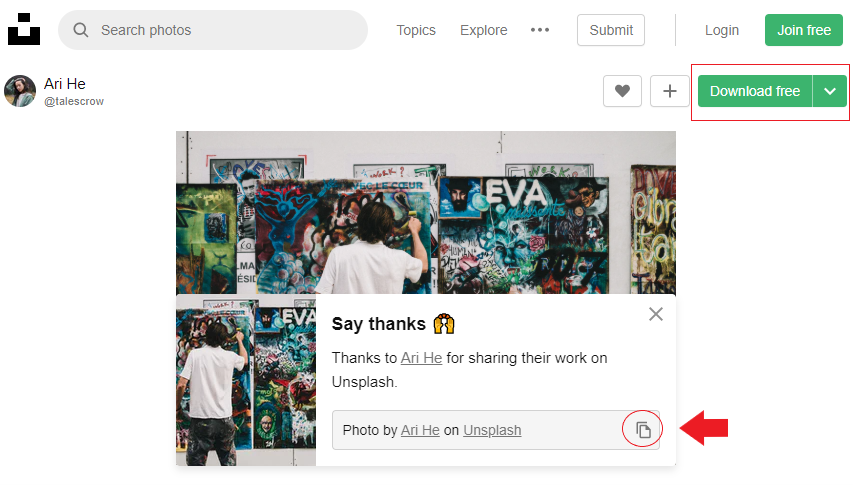
If you go to Unsplash, search for an image and find something you like, you’ll be able to download it.
After you choose to download the image you’ll be prompted to give credit to the artist. Here you can click on the pop-up to copy the attribution link, which you can then use to add an image credit to your blog.

How to Add a Caption to a Featured Image in WordPress
One thing you may notice is that the WordPress featured image often does not show captions.
So if you want to add an image credit to a featured image in WordPress how do you do it?
The easiest way to add an image credit to a featured image in WordPress is to use a plugin. The plugin we recommend is “Featured Image Caption“, and it’s available in the WordPress marketplace.
Once you’ve installed and activated the Featured Image Caption plugin you’ll be able to add a caption to your featured image.
This plugin adds a section in your document menu for your blog post. Here you can add your caption text and image credit.

Final Thoughts
Adding image attribution is easy in WordPress. You’ll want to be sure that any image you use on your blog can be used legally, and follow the steps above to give the artist credit for the good work that they do.
